Saturday, September 19, 2009

Rolled Diaper Cake - Looks good enough to eat....almost

Here's my "How To" for a "Rolled Diaper" diaper cake. As you may know from my previous posts, I'm working on several projects for an upcoming "Pickles & Ice Cream" baby shower I'm helping host for my good friend, Crystal.

Supplies to Get Started: 1 Box diapers
(I used Size 1 Pamper's Swaddlers - 92 diapers in box)
Clear rubber hair bands
( Regular rubber bands may be used, I just feel like these make the project look a little more "put-together)
Cardboard Cake Base (12-13")
Regular Large Rubber bands
String or thin ribbon
Wide Decorative Ribbon
Topper of some kind
(I'm going to go with a topper that goes along with the theme of the party)
Double-sided tape or hot glue gun

Some people opt to use bottles or another center stabilizer. This time, I chose to use only diapers, because the box I chose to purchase was large, and I wanted to use as many of the diapers as possible.

1. Rock & Roll: Get some good music pumping & prepare your hands for some rolling action! Roll each of your diapers as neatly as possible starting from the decorative outside & rolling in - toward the center of the diaper. (This method of rolling will not expose the diaper graphics, however diapers can be rolled to leave this exposed if that's the look you're going for).

2. Center & Snap: Once you've got a diaper rolled tightly & neatly, find the center of the diaper and neatly align a clear rubber band. This will hold your rolled diaper neatly in place, while maintaining the integrity of the diaper for later use.


3. Tiering Up: This is the part that can get a little tricky. You'll want to assemble the diapers in circles. For this project I'm making 3 separate tiers. This may take some practice, but with some patience, you should be able to form great-looking circles out of your rolled diapers and hold them together using rubber band (on the top & possibly 2nd layer) and string on the large base tier.


Typical diaper formula might be as follows
:
Top: 1 diaper, surrounded by 6 diapers = 7 Middle: 1-6-12= 19 Base: 1-6-12-19= 38 For a total use of 64 diapers

I modified my formula a bit, to fit all 92 Size 1 Pampers Swaddlers diapers into my rolled diaper cake. Formula for 92 Diapers:
Top: 3-9 = 12 Middle: 4-10-16= 30 Bottom: 1-5 -10 -15-19=50

Once all of your layers are complete, you may begin stacking them onto the cardboard base for stability.

4. Icing on the Cake: When you've got your tiers created, it's time to cover up the rubber bands using your decorative ribbon. Have fun & go wild. Secure the ribbon to itself with double-sided tape or hot glue. Then, put your topper on the 1st tier, and cover your creation with bags until the big day!


5. Ooh La La:
Set up your creation at the big event & smile as your important guest enjoys her beautiful centerpiece. You've done a great job & created a beautiful centerpiece that is also practical for baby! Great job!


I told you I was making my ice cream scoop fizzy bath bombs for a special occasion. Well, here it is! With a cherry on top! ;)


The shower was so cute, and so was Crystal. She is expecting any time now, and we can't wait to meet baby Evan! The girls that helped organize the shower did such a great job. It was nice getting to meet everyone. I had a great time helping! Hopefully I can get some better non-iphone pics from the party soon. ;)
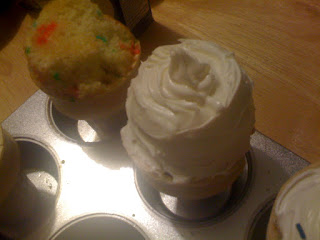
Cuppies & Cones

The "Pickles & Ice Cream" shower I'm helping host inspired me to stir something else up in the kitchen. The shower is still a weekend away, but I wanted to practice on some Cupcake Ice Cream Cones for the special occasion.

I decided to go with Funfetti cake by Pillsbury, and some flat bottomed cones. The directions I used to make the cupcake cones on howstuffworks.com suggested that I make the cupcakes and place the cones upside down on top of them as they baked. They definitely made a better "scoop" on top, but the cone was empty, which was a little sad.

I also made a few by filling the cones 3/4 full with batter, then baking them right-side-up inside the cones. The cake filled the entire cone, which was great, but there was very little for the "scoop".


Icing made them both work beautifully! ;)


All in all, both implementations were successful. I'll have to find some delicious icing to use & decide which method to go with for the big day. I'm going to make 1 batch of chocolate & 1 batch of Funfetti so that people can get a taste of whichever they prefer.


And of course, my handsome assistant also served as a happy taste-tester. These passed with flying colors! I can't wait to share them!


Tomorrow I'm experimenting with some Marshmallow/Cream- Cheese Icing. Yum!!

Fizzy Baths are the Bomb!


I'm working on a few projects for an upcoming "Pickles & Ice Cream" baby shower I'm helping to host for my good friend. This past weekend, my beautiful sister-in-law, Jennica, & our good friend Heath let our creative juices & the essential oils flow - and we created some awesome Chai Tea Bath Bombs.

I found the best recipe at eHow here: How to Make a Chai Tea Bath Bomb, scoured the town for ingredients & got to work. I used the ingredients they suggested, along with a few others that I felt were good for scent.

The goal was to make bath bombs that looked like scoops of vanilla ice cream & smelled equally delicious. I'm going to be using them for another project that I'll post later.

Finding Citric Acid proved to be an interesting challenge, but I finally managed to get the only 2 bottles at Akin's Natural Foods store. I think next time, with better planning I'll opt to order the citric acid online, so that I can purchase more at one time.

Another challenge was the vanilla essential oil. When I finally found a small container of it, the price almost knocked me out. Apparently the best varieties can be valued at up to $300 for a small container! Even the $25 bottle I found was WAY out of my price range. Whew! The I considered using extract, but didn't want the bath bombs to turn out sticky, or to begin their fizzing reaction before they hit the tub. So, I settled on a "freshly baked cookie" scented oil from Target for about $3.00. It smells delicious, the instructions said that it was appropriate for use in soaps, and it fits into my budget. Perfect!

So, a little mixing, stirring, pouring, remixing, packing drying & baking &...voila! Perfect fizzy bath bombs - shaped like ice cream scoops. These would have been expensive to buy, and let's admit it....not 1/2 as much fun. ;) Can't wait to see them in action!

Getting stains out of carpet.....on the cheap!

Hey! I have been meaning to post about my new-found solution for cleaning carpets.

I have hard floors, and a couple of large area rugs - which we love. ;)

Unfortunately, after a little dog living with us and several years of foot traffic - one of our rugs was in REALLY bad shape. We cleaned the rug with commercial carpet cleaners and it worked, temporarily. Unfortunately, after a few weeks, some dark spots started appearing all over the carpet - wherever the rug cleaner had been applied. See the not so pretty picture below. It looks like something has been spilled & splashed all over the carpet, but it hasn't.

And, that's just a small portion. The entire carpet was this bad (or worse).

So, I found a recipe for making my own cleaning solution. I used 1/4 cup of white vinegar, 1/4 cup of laundry detergent (I used Simplicity - "free") and about 1.5 cups of warm water. Then I grabbed an old tooth brush, and got to scrubbing....surprisingly, I didn't have to scrub for long!


Finally, I let the solution set, and vacuumed over it after it was dry. What I ended up with was amazing! The results were fantastic. I was so pleased, I wanted to share it with you.

This was the cheapest & easiest carpet cleaning experience ever. Hope it works for you too!

Wednesday, September 16, 2009

More for the room - Pottery Barn Kids Brooke bedding

I love love love Pottery Barn Kids "Brooke" bedding. I think it's what I want to use in our little girl's room. The only thing holding me back is price. Just not sure whether it's worth it or not, even though it's got so many components that I love: owls, trees, birdies, bright colors & fun fabric, along with plenty of blue & green to compliment the room's paint.

My main hesitation stems from the fact that I already purchased some bedding at a "Just Between Friend's" consignment sale last month. I found a skirt, bumper & fitted sheet for about $45, and it was shabby chic & hand sewn. I loved it at the sale, and thought it would be a great buy, but now that it's home, I think it might be more floral than I want for every day. It's really cute, but may be a little too froufy for me. I know all of those of you who know me, know I occasionally enjoy a frou frou thing or two, but for the most part, I'd describe my tastes as comfortable & easy to live in. I tend to gravitate toward comfort in all things - decor, clothing, shoes....;)

Anyway, I'll post pictures of the Pottery Barn Kids "Brooke" bedding below & I'll include some pictures of the bedding I already picked up later for some of your opinions!

I also thought it might be fun to get some of my creative friends to sew a square each for a quilt that I could compile for our little one. It would be a sweet keepsake, if I could somehow keep it flowing. I really think that would be fun.

Here is the "Brooke" set. Do you see why I love it? (Sorry the image is so blurry - Blogger was giving me some major trouble this evening. After about 45 min. of messing with it....I gave up. ;)