Monday, December 28, 2009

Merry CHRISTmas to all!


Hey everyone! Hope you had a fantastic CHRISTmas full of fun, family and friends. We just wrapped up our final celebration with family and I am feeling overwhelmed with love. ;)

I am planning on posting some of the cool items from my giftbox...I can't resist sharing. The reason for the season is NOT forgotten! Thank you Lord for giving us a reason to celebrate the birth of your son!

I also plan on posting some craft things I've done lately. I just need to organize my life first. I know with the arrival of my little one soon, I'll have a lot of time sitting.....and hopefully some time to organize my pics and thoughts for some tutorials.

I also am looking forward to hopefully starting an Etsy store and Craft group with my family! I have some pretty talented friends and family & can't wait to get together with them to try out some new ideas!

What are you thankful for? What are a few of your favorite things? What are you looking forward to in the New Year?

Wednesday, December 9, 2009

Blogging Dilemma

Does anyone know.....I have had this blog since before I was married. I actually started it while doing a study abroad program in Sweden. My dilemma is this: I have included a lot of personal information on this blog - intertwined with creative and crafty things. I would like to separate my blogs out. Make one of mine personal & private, and then make the other one open for my creative projects, etc.

Does anyone know how to move postings from one blog to another? This might be too much to tackle, but I really hope not!

HELP!!!!


Thanks a million!
-Mandy

Thursday, November 26, 2009

Happy Thanksgiving!

Hey everyone! Happy Thanksgiving. I'm slacking on my picture duties lately...and well-aware that this is a no-no for any blogger. ;) So, no pictures today, but I wanted to say that I feel so blessed to have such amazing family and friends. Thank you all for being such a big part of our lives. You are truly loved!

Monday, November 23, 2009

Potty Training Success!!


We have an official BIG BOY in our house.

We struggled through attempting to Potty train WAY before our little guy was ready. I selfishly wanted him to be potty trained before the end of the summer - when I would have to return to school. He was barely 2, and although he understood the concept of #1 about 80% of the time, he couldn't (or didn't want to) give #2 a try.

Then...3 weeks ago, on a Thursday night, we pulled out the underwear again. He has been staying dry through the night, so we thought it might be time to attempt it again. He's now 2.5 and has seemed (slightly) more interested in the potty. His #2's were pretty consistent, to the point that I could put him in a pull-up most of the time (instead of his undies), but of course we had the occasional accident.

We started with pull-ups at night and at daycare, then one week later, were in big boy underwear full-time. We gave him one M&M per successful #1, and he consistently went. Once he got the hang of that, I remembered some trucks I had tucked away for a special occasion or a rainy day. Perfect for incentive to go #2 in the potty. That's all it took! We had 4 trucks, then bought a package of 5 hot wheels. He got 1 per #2 success. By the final truck, he was saying that he was a "winner" when he went, and he did an AMAZING job! He caught on so quickly.

Now he even stays dry during naps & overnight. At daycare last week - he used underwear & has had 0 accidents so far.

I'm so proud of him, and kind of in shock at how easy it was - once he was ready. He's going to be such an AWESOME big brother. He loves his new independence and Daddy & Mommy are so very proud!

Sunday, November 1, 2009

Play kitchen craft-along

I have a fun project to work on...and hope some people will join me. I *may* not get it finished along with the rest of the group, but I will pay close attention the tutorial, and hopefully end up with a new play kitchen eventually.

I wanted to share this great craft-together workshop from "Out of the Crayon Box".

What do you say? If I get good at these, maybe I'll try to do what she does and sell them to raise $ for charities. Sounds fun huh?

Saturday, October 17, 2009

Blue's Clues Pumpkin


My little guy came home from his school with a small - but perfect - pumpkin. :)

He immediately asked for a Blue's Clue Pumpkin. I wasn't sure how I was going to carve Blue onto such a small pumpkin, but I was able to paint it. He was excited & he even got to help.

On one side I drew Blue, then painted her in. On the other side, I drew Blue's clue paw print. After the little artist painted away on his side, I filled it in with blue glitter & outlined it with glow-in-the-dark paint. That should be a fun clue for trick-or-treaters!

It was a TON of fun. Go get painting! ;)

Thursday, October 15, 2009

Love this site - wanted to share!


I just wanted to share that I found a site today that I might have a little crush on. Mainly because of the possibilities it offers. I am so excited, and can't wait to get to try out some of the fabrics they offer.

They have a blog & a website. Please check them out, then show me what you make! ;)

www.fabricworm.com

http://blogspot.fabricworm.com

Monday, October 12, 2009

Pumpkin Carving Party!!!


Nothing quite says fall like gathering with friends and family to carve some big orange pumpkins! We also ate some festive fall food & finished the evening with pumpkin pie. Perfect!

I made my own owl pattern - and was pretty happy with the way it turned out. All in all - I was pretty impressed with every pumpkin carver's creation. Just wanted to share some of our pics. If you get in the pumpkin carving mood, please share your pics too!


Thursday, October 8, 2009

It's Raining it's Pouring....


The old man is snoring. Seriously though...it's pouring.

Every time we have a streak of thunderstorms I dredge through the water in my non-water-proof shoes thinking...I really need a pair of rain boots. They are so stinkin' cute anyway - so what's stopping me? (Besides the obvious fact that I'm not fond of spending large amounts of money on things I don't think I really need) or (besides the fact that I feel guilty almost every time I purchase something for myself).....nothing!

Anyway...today after plodding through the puddles in my soaked shoes, I miraculously found myself at Academy - where rainboots are surprisingly reasonably priced. After some careful consideration and a Facebook pole - I ended up with a cute pair of leopard print boots - so excited!

I tried them out this evening & must admit - I waited far too long to make this purchase. If you are debating about getting yourself a pair - do it now! My feet are dry, happy & dressed up!

Just wanted to get that out!

Tuesday, October 6, 2009

Trick or Treat - goodies

Mummy Dogs (ourbestbites.com)
Yum! I just found some great snack ideas for some Trick-or-Treat inspired food at http://www.ourbestbites.com/2009/10/easy-halloween-party-food.html

Here are are few of my favorites, but you shoudl definitely hop on over & take a look!

Bones n'Blood (ourbestbites.com)

Candy Corn Pizza - My favorite idea - (www.ourbestbites.com)

Saturday, September 19, 2009

Rolled Diaper Cake - Looks good enough to eat....almost

Here's my "How To" for a "Rolled Diaper" diaper cake. As you may know from my previous posts, I'm working on several projects for an upcoming "Pickles & Ice Cream" baby shower I'm helping host for my good friend, Crystal.

Supplies to Get Started: 1 Box diapers
(I used Size 1 Pamper's Swaddlers - 92 diapers in box)
Clear rubber hair bands
( Regular rubber bands may be used, I just feel like these make the project look a little more "put-together)
Cardboard Cake Base (12-13")
Regular Large Rubber bands
String or thin ribbon
Wide Decorative Ribbon
Topper of some kind
(I'm going to go with a topper that goes along with the theme of the party)
Double-sided tape or hot glue gun

Some people opt to use bottles or another center stabilizer. This time, I chose to use only diapers, because the box I chose to purchase was large, and I wanted to use as many of the diapers as possible.

1. Rock & Roll: Get some good music pumping & prepare your hands for some rolling action! Roll each of your diapers as neatly as possible starting from the decorative outside & rolling in - toward the center of the diaper. (This method of rolling will not expose the diaper graphics, however diapers can be rolled to leave this exposed if that's the look you're going for).

2. Center & Snap: Once you've got a diaper rolled tightly & neatly, find the center of the diaper and neatly align a clear rubber band. This will hold your rolled diaper neatly in place, while maintaining the integrity of the diaper for later use.


3. Tiering Up: This is the part that can get a little tricky. You'll want to assemble the diapers in circles. For this project I'm making 3 separate tiers. This may take some practice, but with some patience, you should be able to form great-looking circles out of your rolled diapers and hold them together using rubber band (on the top & possibly 2nd layer) and string on the large base tier.


Typical diaper formula might be as follows
:
Top: 1 diaper, surrounded by 6 diapers = 7 Middle: 1-6-12= 19 Base: 1-6-12-19= 38 For a total use of 64 diapers

I modified my formula a bit, to fit all 92 Size 1 Pampers Swaddlers diapers into my rolled diaper cake. Formula for 92 Diapers:
Top: 3-9 = 12 Middle: 4-10-16= 30 Bottom: 1-5 -10 -15-19=50

Once all of your layers are complete, you may begin stacking them onto the cardboard base for stability.

4. Icing on the Cake: When you've got your tiers created, it's time to cover up the rubber bands using your decorative ribbon. Have fun & go wild. Secure the ribbon to itself with double-sided tape or hot glue. Then, put your topper on the 1st tier, and cover your creation with bags until the big day!


5. Ooh La La:
Set up your creation at the big event & smile as your important guest enjoys her beautiful centerpiece. You've done a great job & created a beautiful centerpiece that is also practical for baby! Great job!


I told you I was making my ice cream scoop fizzy bath bombs for a special occasion. Well, here it is! With a cherry on top! ;)


The shower was so cute, and so was Crystal. She is expecting any time now, and we can't wait to meet baby Evan! The girls that helped organize the shower did such a great job. It was nice getting to meet everyone. I had a great time helping! Hopefully I can get some better non-iphone pics from the party soon. ;)

Cuppies & Cones

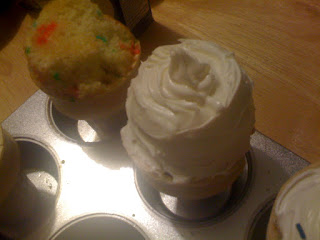
The "Pickles & Ice Cream" shower I'm helping host inspired me to stir something else up in the kitchen. The shower is still a weekend away, but I wanted to practice on some Cupcake Ice Cream Cones for the special occasion.

I decided to go with Funfetti cake by Pillsbury, and some flat bottomed cones. The directions I used to make the cupcake cones on howstuffworks.com suggested that I make the cupcakes and place the cones upside down on top of them as they baked. They definitely made a better "scoop" on top, but the cone was empty, which was a little sad.

I also made a few by filling the cones 3/4 full with batter, then baking them right-side-up inside the cones. The cake filled the entire cone, which was great, but there was very little for the "scoop".


Icing made them both work beautifully! ;)


All in all, both implementations were successful. I'll have to find some delicious icing to use & decide which method to go with for the big day. I'm going to make 1 batch of chocolate & 1 batch of Funfetti so that people can get a taste of whichever they prefer.


And of course, my handsome assistant also served as a happy taste-tester. These passed with flying colors! I can't wait to share them!


Tomorrow I'm experimenting with some Marshmallow/Cream- Cheese Icing. Yum!!

Fizzy Baths are the Bomb!


I'm working on a few projects for an upcoming "Pickles & Ice Cream" baby shower I'm helping to host for my good friend. This past weekend, my beautiful sister-in-law, Jennica, & our good friend Heath let our creative juices & the essential oils flow - and we created some awesome Chai Tea Bath Bombs.

I found the best recipe at eHow here: How to Make a Chai Tea Bath Bomb, scoured the town for ingredients & got to work. I used the ingredients they suggested, along with a few others that I felt were good for scent.

The goal was to make bath bombs that looked like scoops of vanilla ice cream & smelled equally delicious. I'm going to be using them for another project that I'll post later.

Finding Citric Acid proved to be an interesting challenge, but I finally managed to get the only 2 bottles at Akin's Natural Foods store. I think next time, with better planning I'll opt to order the citric acid online, so that I can purchase more at one time.

Another challenge was the vanilla essential oil. When I finally found a small container of it, the price almost knocked me out. Apparently the best varieties can be valued at up to $300 for a small container! Even the $25 bottle I found was WAY out of my price range. Whew! The I considered using extract, but didn't want the bath bombs to turn out sticky, or to begin their fizzing reaction before they hit the tub. So, I settled on a "freshly baked cookie" scented oil from Target for about $3.00. It smells delicious, the instructions said that it was appropriate for use in soaps, and it fits into my budget. Perfect!

So, a little mixing, stirring, pouring, remixing, packing drying & baking &...voila! Perfect fizzy bath bombs - shaped like ice cream scoops. These would have been expensive to buy, and let's admit it....not 1/2 as much fun. ;) Can't wait to see them in action!

Getting stains out of carpet.....on the cheap!

Hey! I have been meaning to post about my new-found solution for cleaning carpets.

I have hard floors, and a couple of large area rugs - which we love. ;)

Unfortunately, after a little dog living with us and several years of foot traffic - one of our rugs was in REALLY bad shape. We cleaned the rug with commercial carpet cleaners and it worked, temporarily. Unfortunately, after a few weeks, some dark spots started appearing all over the carpet - wherever the rug cleaner had been applied. See the not so pretty picture below. It looks like something has been spilled & splashed all over the carpet, but it hasn't.

And, that's just a small portion. The entire carpet was this bad (or worse).

So, I found a recipe for making my own cleaning solution. I used 1/4 cup of white vinegar, 1/4 cup of laundry detergent (I used Simplicity - "free") and about 1.5 cups of warm water. Then I grabbed an old tooth brush, and got to scrubbing....surprisingly, I didn't have to scrub for long!


Finally, I let the solution set, and vacuumed over it after it was dry. What I ended up with was amazing! The results were fantastic. I was so pleased, I wanted to share it with you.

This was the cheapest & easiest carpet cleaning experience ever. Hope it works for you too!